Set up sending · Updated Oct 8, 2026
Set up your domain (DNS)
In short
Four small records in your domain's settings tell inboxes your mail is really yours. Without them, most cold email lands in spam. Adding them takes about 15 minutes.
SPF
Which servers may send for your domain.
Without it: mail is rejected or lands in spam.
DKIM
The email wasn't changed on the way.
Without it: inboxes trust it less.
DMARC
What to do when SPF or DKIM fail.
Without it: Gmail and Yahoo trust it less.
MX
Where your domain receives mail.
Without it: replies and bounces never arrive.
Where to add records
Records are added at your DNS host: usually where you bought the domain, or Cloudflare if you moved it there. SendPath never changes your DNS; it shows you what to add.
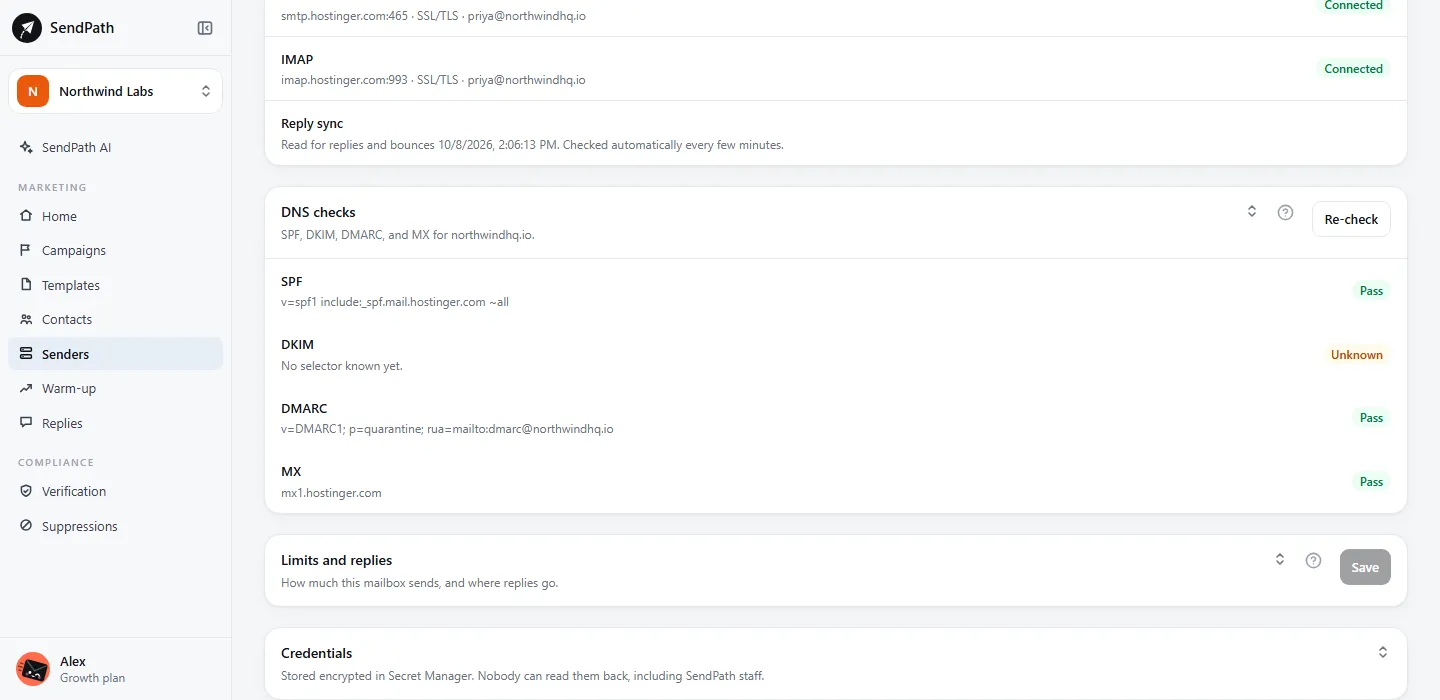
- Step 1: On Senders, open a mailbox on the domain. DNS checks shows what's missing and the exact record to add.
- Step 2: Sign in to your DNS host and open the domain's DNS settings (see the table below).
- Step 3: Add the record: its type, its host (or name) and its value, exactly as shown.
- Step 4: Back on the mailbox, click Re-check. Most hosts update within minutes; some take a few hours.
- Cloudflare
- Where the records are: Your domain, then DNS, then Records. Click Add record.
- GoDaddy
- Where the records are: My Products, then your domain's DNS. Click Add New Record.
- Namecheap
- Where the records are: Domain List, then Manage, then Advanced DNS. Click Add New Record.
- Squarespace (was Google Domains)
- Where the records are: Domains, then your domain, then DNS, then Custom records.
- Anyone else
- Where the records are: Look for DNS, DNS records, Zone editor or Advanced DNS.
In the host field, @ means the domain itself. A host that wants the full name takes acme.com instead, and _dmarc becomes _dmarc.acme.com.
SPF: who may send for your domain
One TXT record that lists your email provider. For Google Workspace:
For Microsoft 365, the include is include:spf.protection.outlook.com. For any other provider, Senders shows the right one, or ask your provider.
- A domain must have only one SPF record. If you already have one, add the include to it instead of adding a second record.
- End it with ~all, never +all.
DKIM: a signature on every email
DKIM is switched on at your email provider, not in SendPath. The provider gives you a record to add, then you tell it to start signing.
- Google Workspace: Admin console, Gmail, Authenticate email. Generate the record, add it at your DNS host, then click Start authentication. Google's guide.
- Microsoft 365: the Defender portal, Email authentication settings, DKIM. Add the two CNAME records it shows, then turn on signing. Microsoft's guide.
- Sending services (Resend, Mailgun and others) show their DKIM records on their domain settings page.
Until a mailbox has sent, Senders may show DKIM as not verified. That's a warning, not a block.
DMARC: what to do with mail that fails
Add this TXT record. It only asks for reports and never blocks your own mail. Gmail and Yahoo expect one.
MX: where your domain receives mail
MX records say which server receives mail for your domain. Without them, replies and bounces never arrive. Your email provider gives you the values. All your MX records must point to one provider: records for two providers split your mail, and part of it disappears.
If something's wrong
- I added the record, but Senders still shows it failing.
- Wait a few minutes and click Re-check. Check the host field: some DNS hosts add the domain for you, so
_dmarc.acme.comtyped in full becomes_dmarc.acme.com.acme.com. - Senders says the domain has more than one SPF record.
- Keep one SPF record and move every include: from the others into it, then delete the others.
- I don't know who my DNS host is.
- Look up the domain's nameservers (any 'NS lookup' site shows them). The company they point to is your DNS host.
Was this page helpful?
Related
Something missing or wrong? Email support@sendpath.ai.